当用计算机思维进行Logo设计时? | D2Learn开源社区
-
最近在github上创建了一个d2learn社区, 于是就想着怎么也得搞个Logo吧, 于是结合社区背景设计了如下Logo

这个logo初看, 可能看不出什么。但是如果给一个提示: 二进制。那么我相信很多有一些计算机背景的同学, 肯定就能猜到这个logo的设计思路了 —— 二进制 + ASCII码。下面就来详细的介绍一下D2Learn Logo和其动画的创作过程
Logo想法的诞生过程
由于d2learn是一个关于技术知识分享、学习、交流的开源社区。所以logo设计的时候希望体现一定的技术背景并且一定程度的能表达d2learn, 这样就有了大体框架
- 用二进制做技术背景表达
- 把d2learn含义直接或间接的融入Logo
从文字到图案 - 二进制和ASCII码

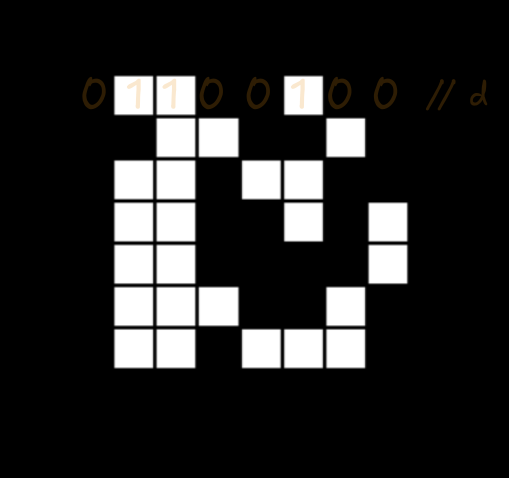
这样我们就能很容易把 d2learn或其中的几个字母通过ASCII转成对应的二进制
d2learn
01100100 00110010 01101100 01100101 01100001 01110010 01101110
或许可以换个排序方式?
01100100 // d
00110010 // 2
01101100 // l
01100101 // e
01100001 // a
01110010 // r
01101110 // n
似乎有点"图案"的感觉了
起初也差点就想把0和1的颜色调一下就当做社区logo的, 但想了想是不是有点太直白了点?
同时也想到了0和1与颜色中黑与白似乎是对应的, 这样就可以把0用黑色表示, 1用白色表示就能自然的形成一个图案了
这样看起来就感觉有点哪个意思了, 但还是单调了点。或许可以把白色换成天蓝色(青-CYAN)似乎更有科技感一点?

到这 基本这里 图案也有了、含义也有了、但似乎还是缺少了一点“艺术性”?
融入色彩艺术
由于一个字节由8个bit位组成, 但是ACSII码的最高位都是0, 并且d2learn也是7个字母。这就导致Logo的实际大小是7x7。在这种情况下如果要突出8这个数字或者显式一点8bit的含义就是把7x7扩展到8x8。
为了不破坏图案, 或许可以给已经形成的图案加一个底座, 并且底座必须要8bit都要点亮才符合我们的期望, 这里的难点就变成了底座的颜色选择了
如果采用一种颜色会不会感觉太单调? 如果采用多色那又选择哪些颜色呢?
能不能把“所有颜色”都融入这个logo里呢? 这个时联想到先前的白色、色散、光谱色(彩虹色)。这样就恰到好处 [红、橙、黄、绿、青、蓝、紫] + 白 正好是8种颜色。这样我们logo底盘的8个bit位就可以用这些颜色点亮了, 也就形成了最开始的logo图案

并且黑色也作为背景色没有缺席
Logo动画生成
使用8x8的像素面板, 然后从上到下依次控制像素的显示
- bit为1的像素: 执行FadeIn动画
- bit为0的像素: 执行FadeOut动画
最后形成的效果就有点Terminal控制终端闪烁的输入提示符一样, 一个一个的输入像素的感觉...
动画生成代码
#include <vector>

#include "hanim.h"


using namespace hanim;

const static int THICKNESS_240P = 1;
const static int THICKNESS_480P = 2;
const static int THICKNESS_1080P = 4;

const static int THICKNESS = THICKNESS_480P; // THICKNESS_1080P;

static std::vector<std::vector<bool>> d2learnLogoMap {
    {0,1,1,0,0,1,0,0}, // d
    {0,0,1,1,0,0,1,0}, // 2
    {0,1,1,0,1,1,0,0}, // l
    {0,1,1,0,0,1,0,1}, // e
    {0,1,1,0,0,0,0,1}, // a
    {0,1,1,1,0,0,1,0}, // r
    {0,1,1,0,1,1,1,0}  // n
};

struct D2LearnLogo : public Scene {
    virtual void timeline() override {
        auto logo = PixelPanel();
        logo.stroke_color(HColor::BLACK);
        logo.scale(2);
        //play(Create(logo));
        for (int i = 0; i < 7; i++) {
            for (int j = 0; j < 8; j++) {
                if (d2learnLogoMap[i][j]) {
                    play(FillColor(logo[i][j], HColor::CYAN), 5);
                } else {
                    play(FadeOut(logo[i][j]), 5);
                }
            }
        }
        play(FillColor(logo[7][0], HColor::RED), 10);
        play(FillColor(logo[7][1], HColor::ORANGE), 10);
        play(FillColor(logo[7][2], HColor::YELLOW), 10);
        play(FillColor(logo[7][3], HColor::GREEN), 10);
        play(FillColor(logo[7][4], HColor::CYAN), 10);
        play(FillColor(logo[7][5], HColor::BLUE), 10);
        play(FillColor(logo[7][6], HColor::PURPLE), 10);
        play(FillColor(logo[7][7], HColor::WHITE), 10);
    }
};

int main() {
    hanim::HEngine::default_config1();
    //hanim::HEngine::set_window_size(320, 240);
    //hanim::HEngine::default_config2();
    hanim::HEngine::recorder_file_name("d2learn-logo");
    hanim::HEngine::render(D2LearnLogo());
    hanim::HEngine::save_frame_to_img("d2learn-logo.png");
    return 0;
}
动画视频
- https://youtu.be/fcbqFNC4DDQ
- https://www.bilibili.com/video/BV1hAxBe1EVC
- https://github.com/user-attachments/assets/03999462-5902-4e03-82e8-47289cabbe4b
Other
-
增加了一个像素点之间液化连接视觉测试功能
<!DOCTYPE html>
<html lang="en">
  <head>
    <meta charset="UTF-8" />
    <meta name="viewport" content="width=device-width, initial-scale=1.0" />
    <title>Document</title>
    <style>
      body {
        background-color: black;
        color: white;
        display: flex;
        flex-direction: column;
        align-items: center;
        justify-content: center;
        height: 100vh; /* 使 body 高度为视口高度 */
        margin: 0; /* 去除默认的 margin */
      }
      .matrix {
        display: flex;
        flex-direction: column;
        margin: 10px 0;
        padding: 5px;
        filter: contrast(500%);
      }
      .row {
        display: flex;
      }
      .cell {
        width: 20px; /* 每个单元格的宽度 */
        height: 20px; /* 每个单元格的高度 */
        display: flex;
        align-items: center;
        justify-content: center;
        border: none; /* 单元格边框 */
        margin: 0; /* 单元格间距 */
        filter: blur(10px); /* 默认模糊效果 */
        transition: filter 0.3s ease; /* 过渡效果 */
      }
      .cell.true {
        background-color: rgb(255, 255, 255); /* 1 的背景色 */
      }
      .cell.false {
        background-color: rgb(0, 0, 0); /* 0 的背景色 */
      }
      .slider-container {
        margin-top: 20px; /* 滑动框与矩阵的间距 */
      }
      .input-container {
        margin-bottom: 20px; /* 输入框与滑动框的间距 */
      }
    </style>
  </head>
  <body>
    <div class="input-container">
      <label for="wordInput">输入单词: </label>
      <input type="text" id="wordInput" value="d2learn" />
      <button id="lookUpButton">查询</button>
    </div>
    <div class="slider-container">
      <label for="blurRange">调整模糊程度: </label>
      <input type="range" id="blurRange" min="0" max="50" value="10" />
    </div>
    <div class="slider-container">
      <label for="contrastRange">调整对比度: </label>
      <input type="range" id="contrastRange" min="100" max="5000" value="500" />
    </div>
    <script>
      function charToAsciiBinaryArray(char) {
        const asciiCode = char.charCodeAt(0);
        const binaryString = asciiCode.toString(2).padStart(8, "0");
        return Array.from(binaryString, (bit) => bit === "1");
      }

      function stringToBinaryArrays(str) {
        return str.split("").map(charToAsciiBinaryArray);
      }

      function updateMatrix(word) {
        const d2learnBinaryArray = stringToBinaryArrays(word);

        // 清空矩阵内容
        matrixContainer.innerHTML = "";

        // 创建新的矩阵并添加到 body 中
        d2learnBinaryArray.forEach((row) => {
          const rowDiv = document.createElement("div");
          rowDiv.className = "row";
          row.forEach((cell) => {
            const cellDiv = document.createElement("div");
            cellDiv.className = "cell " + (cell ? "true" : "false");
            rowDiv.appendChild(cellDiv);
          });
          matrixContainer.appendChild(rowDiv);
        });
      }

      const matrixContainer = document.createElement("div");
      matrixContainer.className = "matrix";
      document.body.appendChild(matrixContainer);

      // 初始化默认显示 "d2learn" 的矩阵
      updateMatrix("d2learn");

      // 处理输入框和查询按钮的事件
      const lookUpButton = document.getElementById("lookUpButton");
      lookUpButton.addEventListener("click", () => {
        const word = document.getElementById("wordInput").value; // 获取输入的单词
        updateMatrix(word); // 更新矩阵
      });

      // 处理模糊度滑动框的输入事件
      const blurRange = document.getElementById("blurRange");
      blurRange.addEventListener("input", () => {
        const blurValue = blurRange.value; // 获取当前的滑动值
        const cells = document.querySelectorAll('.cell');
        cells.forEach(cell => {
          cell.style.filter = `blur(${blurValue}px)`; // 设置模糊效果
        });
      });

      // 处理对比度滑动框的输入事件
      const contrastRange = document.getElementById("contrastRange");
      contrastRange.addEventListener("input", () => {
        const contrastValue = contrastRange.value; // 获取当前的滑动值
        matrixContainer.style.filter = `contrast(${contrastValue}%)`; // 设置对比度效果
      });

      console.log(d2learnBinaryArray);
    </script>
  </body>
</html>